In this tutorial, we describe how to create effects using EffectMaker using a flame effect as an example.
The basic procedure is given below.
Effect files created for this tutorial are located in the following location.
" SampleData/Effect/Intermediate/ManualResource/Fire_Effect/Fire_Effect.cptl "
You can load the files as follows.
On the main menu, select File > New > Project to open a dialog box for creating new projects.
Without changing the project name, just press OK.
Press Add a new effect on the Project window tool bar to open a dialog for creating a new effect.
Enter Fire_Effect for Effect Name and press OK.
Load the File_Anim.ctex texture file in the Fire_Effect sample folder into the project
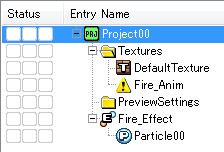
The project window should appear as follows at this point.

Select the Fire_Effect effect and press F5 to transfer data to the Viewer.
You can now create the effect while observing changes on the Viewer.
Sets the shape of the emitter that will emit flame particles.
Double click on Particle00 located under the Fire_Effect effect to open a Property window.
Open Emission under Emitter and select Sphere from Emitter Shapes.
Now, we configure the flame particles.
This setting specifies the particle life time from emission until expiration.
Select Lifespan under Particle and enter the following values.
This setting causes the lifespan of particles to randomly vary in the range of 20 to 30 frames.
The initial velocity when a particle is emitted from an emitter is set to zero.
Select Initial velocity under Particle, and press Delete to disable Random direction (the default setting).
The flame can be made to appear to rise by applying gravity to particles in the upward direction.
Select Field under Particle, then select Gravity from the pull-down menu, press Add and settings used to specify the gravity will be added.
Enter the following values for Gravity parameters.
Sets the color of the particle.
Select Color under Particle and enter the following RGB values.
Textures can be set and then animated using texture patterns.
Change the texture beginning from its default state.
Select Texture mappers under Material, select fire_anim from the pull-down menu, and change the texture.
Four flame patterns have been drawn and placed in the Fire_Anim.ctex texture file. These can be animated one pattern at a time.
Select Vertex UV translation for Texture 0, then select Texture pattern from the animation pull-down window to enable settings used to specify texture patterns.
The following table lists texture pattern input values and descriptions.
| Item | Value | Description |
| U | 4 | The number of patterns in the horizontal direction. |
| V | 1 | The number of patterns in the vertical direction. |
| Playback Order | 0 - 3 | Specifies the order in which to send patterns. Pattern 1 through Pattern 4 are played in order by specifying a value from 0 to 3. |
You can make a texture pattern animation automatically fit inside the lifespan of a particle by setting Playback options to Fit to lifespan.
Now, we use additive animation to further animate the scene by adding variation to the size of flame particles at the time of particle emission.
Apply variation to the size of particles when they are emitted from the emitter.
Select Scale under Particle and enter the following values.
These settings will cause the size of the particle at time of emission to vary in the range from 1.5 to 2.5.
Here, we animate so that particles gradually appear to grow smaller.
Select Additive animation from the animation pull-down menu to display animation settings. Enter the following values.
These settings cause the particles to appear to gradually grow smaller over time by subtracting a given value each frame.
The effect can be animated further by varying the angle at which particles are emitted.
Apply variation to angle particles are emitted from the emitter.
Select Rotation under Particle and enter the following values.
These settings will cause the angle at which particles are emitted to vary in the range from 0 to 720 degrees.
Now, we animate by emitting particles at different angles each time the emitter emits one.
Select Additive animation from the animation pull-down menu to enable animation settings.
Press the button shown below for opening Curve Editor. Curve Editor will appear. Animations can now be configured by creating curves.

Create a curve like the following on Curve Editor for Rotate z.
For information on editing using Curve Editor, see here. →Under construction
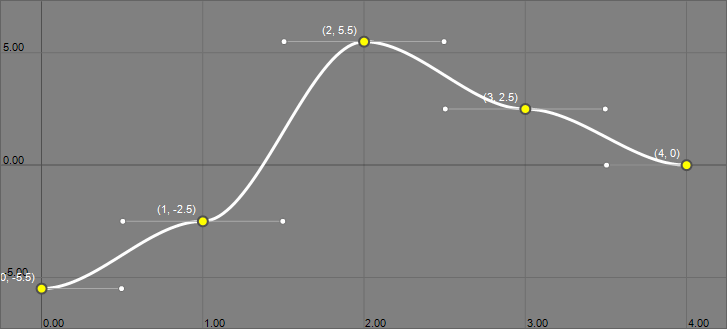
| Frames (Horizontal) | 0 | 1 | 2 | 3 | 4 |
|---|---|---|---|---|---|
| Value (Vertical) | -5.5 | -2.5 | 5.5 | 2.5 | 0 |
A different rotation animation results by setting Playback options to Random table. This is due to randomly adding a value from the curve just created each time the emitter emits a particle.
Particle alpha is animated using In/out animation.
Particles can be animated so they appear to gradually appear and then gradually disappear over their lifespan.
Open Alpha under Particle and select In/out animation from the animation pull-down menu. Settings used for in/out animation will be shown. Make the following settings.
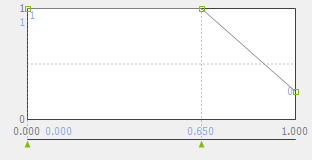
| Frames (Horizontal) | 0.0 | 0.0 | 0.65 | 1.0 |
|---|---|---|---|---|
| Value (Vertical) | 1 | 1 | 1 | 0.25 |
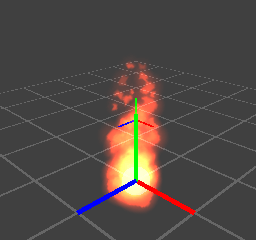
The following is an image of the finished flame effect.
CONFIDENTIAL