This plug-in is used to create mipmap images (vertically arranged images where the width and height of the images have been compressed to 1/2, 1/4, ...) using Photoshop. Each image created for each level becomes a separate layer. If the mipmap creation plug-in is executed and NW4C_Tga (NW4C_ctex) format is used to save the data, the mipmap data is exported.
Prepare an image for the base image. The image width and height must be a power of 2 and have a size equal to or greater than 16.
Select a visible layer if a hidden layer is selected.
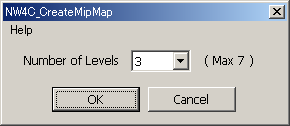
A dialog box will appear if you execute [Automatic Processing] -> [NW4C_CreateMipMap] on the [File] menu.
Enter the number of mipmap levels. At this time, count the base image as 1 level. The minimum number of levels is 2 and the maximum number of levels depends on the size of the original base image (maximum 8).
If All is selected, create images up to the maximum number of levels for the given size of the base image.
If All(ETC1) is selected, create images up to the maximum number of levels when using ETC1 compression for the given size of the base image (the maximum number is 7) .
Click [OK] to create the mipmap image.
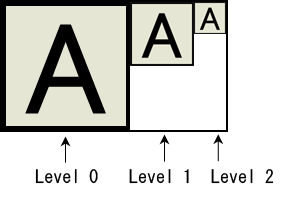
The image for each level represents a different layer arranged as shown in the following figures.
[MIP Map Image (Level Number: 3)】
To change the image pattern after creating the mipmap image, edit the data of each layer. However, layers must not be moved and image sizes must not be changed.
If a layer is unneeded, the image can be integrated.
After the mipmap creation plug-in is executed, all layers are integrated if data is saved and reloaded in NW4C_Tga (NW4C_ctex) format. Under this condition, layers can be restored for each level by executing the mipmap creation plug-in.
Even if an image has not been created using the mipmap creation plug-in, Use MipMap can be selected when saving in NW4C_Tga (NW4C_ctex) format by executing the mipmap creation plug-in as long as the mipmap images, each having half the width and height of the next, have been arranged horizontally with their top edges aligned.
The number of mipmap levels can be changed by changing the width of the mipmap image and then executing the mipmap creation plug-in. For example, assume that a mipmap with three levels has been created for a 32x32 image. To change the number of levels to 2, set the height to 48 (= 32 + 16) using [Canvas Size] on the [Image] menu. (This sets the top as the anchor.) The number of levels will become 2 when the mipmap creation plug-in is executed.
A vertically aligned mipmap image can be converted to a horizontally aligned mipmap image by executing the mipmap creation plug-in on the vertically aligned image. (With a vertically aligned mipmap, each consecutive image has half the width and height of the previous image and images are arranged vertically with their left edges aligned.)
Executing only when the image mode is gray scale, index color, and RGB color is possible.
If the image mode is index color, the plug-in changes the image mode to RGB color. At this time, a confirmation message appears. Click [OK] to continue or [Cancel] to cancel.
Executing on files that use 16 bits per channel is impossible.
Executing with more than one alpha channel is impossible.
Automatically integrate images to create a compressed image when there is more than one visible layer.
Selecting an interpolation method from [Environment settings] -> [General] on the Photoshop [Edit] menu determines the interpolation method to use to reduce an image.
After the mipmap creation plug-in is executed, all layers are integrated if data is saved and reloaded in NW4C_Tga (NW4C_ctex) format. After loading, layers can be restored for each level by executing the mipmap creation plug-in.
Furthermore, the contents of the margins formed to the lower right of the image are not saved in NW4C_Tga (NW4C_ctex) format.
Execute a color depth or ETC filter after the mipmap creation plug-in has been executed and the image has been integrated.
A warning dialog box is displayed if you attempt to execute the mipmap creation plug-in on the image to which a color depth filter or ETC filter was already applied.
CONFIDENTIAL