The following operations are possible through the combined use of Viewer and SoundMaker.
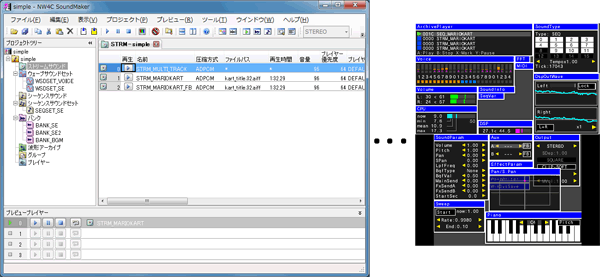
Sounds loaded into SoundMaker can be previewed by communicating with SoundMaker.
In Sound mode, you can check the content of sounds loaded to Viewer and hear how they play when parameters are changed.
In Sound mode, information is displayed separately in various windows.
Below is an example of what a standard screen looks like in Sound mode.
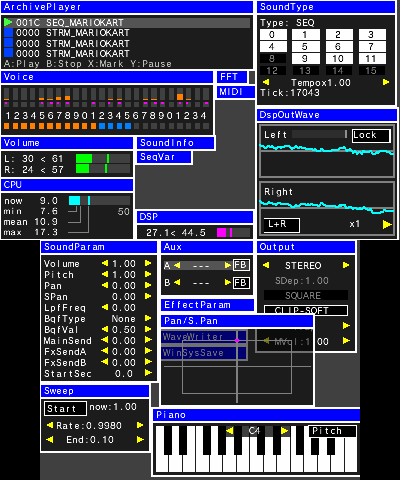
This is the main window, where you do thinks like start and stop the playback of sounds.
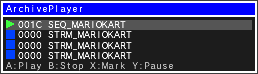
The following information is shown in each line:
Playback status: Play / Stop / Pause / Mark
Number: The number of the selected sound (shown are the lower four digits of the hexadecimal sound ID).
Name: The Name of the selected sound.
Shows information about the playing sounds for the selected line in the ArchivePlayer window. Operations can also be done from here.
・If the playing sound in the selected line is a sequence: Operations for On/Off of each track and the volume level, and display of the current tick count.
・If the playing sound in the selected line is a stream: Operation for On/Off of each track, and display of loop information, sampling rate and playback position.
・If the playing sound in the selected line is a wave sound: Display of loop information, sampling rate and playback position.
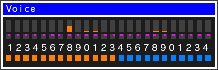
Displays the status of each voice.
The length of the upper bar denotes volume, and the color the priority. Red (streams,etc.) > orange (normal) > blue (release).
The Pan/S.Pan is indicated by the small pink lights in the squares in the middle of the window.
At the bottom is the voice count meter.
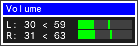
This shows the DSP final output volume (peak level, with maximum = 100).
When the volume exceeds 100 the display is red.
This is linked to locking and scrolling in the DspOutWave window.
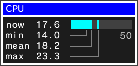
Displays the sound thread load.
From the top, shows the current value, and the maximum, average and minimum values over several seconds. All units are %.
When the load exceeds 50% the display is red.

Shows the DSP load. The unit is %.
Both the current load value and the maximum value over the past several seconds are shown.
When the load exceeds 100% the display is red.
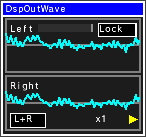
Shows the DSP final output waveform.
Because there is automatic phase correction, a cyclical waveform will appear stopped like an oscilloscope.
Places where the volume is at the maximum show in red.
If the scaling is larger than x32, the maximum and minimum values are shown. For scaling of x2 ~ x16, information is skipped over so you may miss sudden spikes in volume.
For scaling of x32 and higher, samples are checked one at a time and a minimum/maximum range is displayed, so nothing will be overlooked.
Use the lower left button to change the View mode (Both L + R, just L or just R).
Use the lower right button to change the scale.
Press the upper right Lock button stop the waveform from updating. From that point you can scroll the display backward though time.
The lock and scroll position are linked to the Volume window and the FFT window.
Note that because the buffer is shared with the buffer for writing .wav files in the WaveWriter window, waveforms cannot be written to .wav files while Lock is selected.
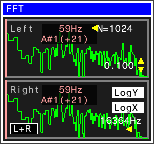
FFT display of the DSP final output waveform.
The N=???? in the upper right is the polynomial degree. (A larger frequency provides higher resolution, but the tradeoff is a greater load on the CPU.)
Touch inside the window to display the frequency at that position a little up and to the right.
Use the up/down arrows to select a maximum value to display for power on the vertical axis. Use the left/right arrows in the lower-right part of the window to select a maximum value to display for frequency on the horizontal axis
Use the LogX and LogY buttons to select linear or logarithmic for the X axis (frequency) and the Y axis (power).
Use the lower left button to select the View mode (Both L + R, just L or just R).
Pitch is detected automatically.
In the default setting (N=1024, 16364 Hz), the error is several Hz.
If precision is required for reasons like tuning, leave N at the maximum value of 1024 and set the frequency to a low 1818 Hz to get the pitch very accurately.
This is linked to locking and scrolling in the DspOutWave window.
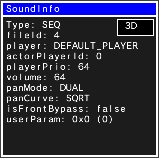
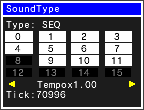
Shows details about the sounds selected in the ArchivePlayer window.
Shown here is the sound type, file ID, player, priority, volume, pan mode, pan curve, front bypass and user parameter.
Pressing the upper-right 3D button displays 3D-related parameters (such as which calculations are enabled for 3D calculations (Flags), the attenuation rate, the attenuation curve and the Doppler coefficient).

If a PARTNER-CTR UIC-MIDI is attached, you can play banks using MIDI.
When you apply SystemUpdater-0_15-XX.csu, this window will not display if the PARTNER-CTR UIC-MIDI is not connected to a PARTNER-CTR Debugger or a CTR test unit.
If you are connected to a PARTNER-CTR UIC-MIDI and the MIDI window still does not display, Load the cci file (not that this is not reload) and try again.
When MIDI signals are received, the corresponding bank is lit green.
This is linked to sound selection in the ArchivePlayer window.
When a sequence sound is selected in the ArchivePlayer window, the banks configured in that sequence sound are set here.
The volume gets set to the volume set on SoundMaker for the selected sound.
Banks and sound volume can be changed in this window as well.
Loading Banks to Heap
Banks already loaded to the heap are shown in white, while those not loaded are shown in gray.
There are two ways to load banks to the heap:
Fixing the Bank Index and Program Number
There is a feature that lets you ignore the bank and program number specified in the sequence and instead play with your own specified number.
The default state is noFixBnk, noFixPrg, and in this state the sound plays according to MIDI signals. However, if for example you change the settings to FixBnk:1, FixPrg:5, then you can play sounds using bank index = 1, program number = 5 regardless of the MIDI signal.
Press the Reset button to reset MIDI.
You can also play from the Piano window if you change the upper-right button from Pitch to MIDI in that window.
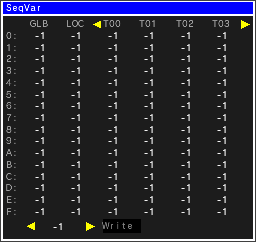
This window is for viewing and changing sequence variables.
Values flash blue when they are changed.
The window displays track variable numbers 0 ~3 by default, but you can use the arrows at the top of the window to change which track variable numbers are shown.
If you want to write a value to a variable, click on the variable so it displays in gray.
By selecting multiple variables you can write to them all at the same time.
Use the left/right arrows in the bottom-left part of the window to set the value you want to write, then press the Write button located to the right of these arrows to write the value.
You can only write to Local and the track variables while sounds are playing, but you can select the variables and set the value ahead of time.
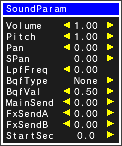
Use this window to change the volume, pitch, pan and other parameters of sounds when they play.
There are independent parameters for each of the number of players (i.e., the number of rows in the ArchivePlayer window). What is shown are the parameters for the currently selected player.
The start offset (StartSec) is currently only supported for sequences.
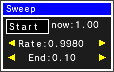
This sets the sweep.
Press the Start button to change the pitch by the proportion specified by Rate up until the value set for End.

Use this window to switch the effect type for Aux and turn front bypass on/off.
Only the effects that are selected will operate.
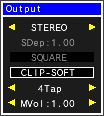
Sets parameters related to output.
You can switch between monaural/stereo/surround sound, change the positions of the sound depth and surround speaker, enable/disable soft clipping, and change the interpolation type and the master volume.
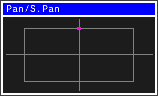
Using touch you can intuitively change the Pan/S.Pan values of the SoundParam window.
Double-click to restore the default value.
The Pan/S.Pan will change if sound is already playing. If sound is not playing, the sound will only play while touching the panel.
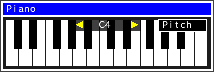
The keyboard shown here can be used to intuitively set the Pitch in the SoundParam window.
The pitch will change if sound is already playing. If sound is not playing, the sound will only play while touching the panel.
Use the left/right arrows in the center of the window to change the octave.
Click on the Pitch button in the upper-right part of the window to switch to Midi and make this a software MIDI keyboard for playing banks.
When you apply SystemUpdater-0_15-XX.csu, the button for switching between Pitch/Midi will not display if the PARTNER-CTR UIC-MIDI is not connected to a PARTNER-CTR Debugger or a CTR test unit.
If you are connected to a PARTNER-CTR UIC-MIDI and the Pitch/Midi switch button still does not display, Load the cci file (not that this is not reload) and try again.
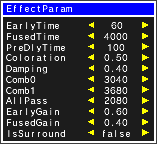
Use this window to set the various parameters for the effect selected in the Aux window.

Saves the DSP final output waveform as a .wav file.
After pressing the Write button, data are saved retroactively for the specified amount of time (up to a maximum of 2 minutes). Note that what gets saved is data for the specified amount of time up to point when the button was pressed, and not for a an amount of time subsequent to pressing.
The file gets saved as $NW4C_ROOT/tools/Viewer/sound/DspOut_?.wav.
? The value in "?" is 0 when the system starts for the first time, and increments by +1 every time a file is written.
Waveform files are shared by the DspOutWave window, so waveforms will not be output while waveform updating is locked in the DspOutWave window.

Use this to save and load the settings for the position, size and depth of each window.
The various parameter values in the various windows do not get saved.
This settings file gets saved to $NW4C_ROOT/tools/Viewer/sound/WinSysSave_?.bin (where ? is 0 ~ 9)
A maximum of 10 sets of settings can be saved, so this is convenient for saving and switching window positions for different tasks.
The following operations can be performed in Sound mode.
Sound mode operations
| Key Operations | Description |
| +Control Pad Up/Down | Switches selection of sound in the ArchivePlayer window. |
| +Control Pad Left/Right | Changes the sound selected in ArchivePlayer. |
| A Button | Plays the sound selected in ArchivePlayer. |
| B Button | Stops play of the sound selected in ArchivePlayer. |
| X Button | Selects multiple sounds in ArchivePlayer and marks them for simultaneous playback. |
| Y Button | Pauses playback of the sound selected in ArchivePlayer. |
| L Button + Left/Right Button | Jumps by units of 0x0100 the sound ID of the sound selected in ArchivePlayer. |
| Slide pad | Moves the cursor in the upper screen. |
| R Button | Pseudo-touch operation at the cursor position in the upper screen. |
| START/SELECT Button + Up/Down Button | Swaps upper/lower display screens. |
| Touch Panel Operations | Description |
| Double-click in title bar |
Switches window between minimize and normal size. (Minimizing the window reduces the CPU load.) |
| Drag the window periphery | Changes the size of the window. |
| Drag the title bar | Changes the position of the window. |
| Button single-click | Changes value. |
| Button double-click |
Restores default value. (Some buttons do not support this.) |
In the next release, the following features will be added to the Sound mode of Viewer:
・Support for preview operations from the PC.
CONFIDENTIAL