In this tutorial, we describe the procedure for using 3D Link to link models and effects exported from 3DEditor.
3D Link is a feature that generates an effect at the specified time and place in a 3D model.
An effect can be created while checking its current state in the Viewer.
The basic procedure is given below.
To link with a 3D model, you must first transfer the model from 3DEditor to the Viewer.
The 3D model used in this tutorial is located in the folder given below.
Load all files in this folder into 3DEditor.
" SampleData/Effect/Intermediate/ManualResource/Model_Link/3DEditor_Data "
For information on using 3DEditor, see the 3DEditor manual.
For details on using the Viewer, see the Viewer manual.
On the main menu, select File > New > Project to open a dialog box for creating new projects.
Without changing the project name, just press OK.
On the main menu, select File > Open, and load all effect data and texture data located in the Model Link folder.
Brief comments on each effect are given below.
You can create link data inside the Project window.
New links can be created in the following ways.
Without changing the link name, just press OK to create link data on the Project window.
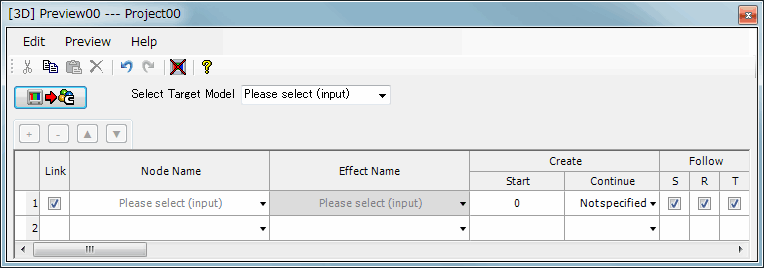
You can display a 3D Link window where you can set parameters.
The 3D Link window can be displayed in three ways.
The following is an image of the 3D Link window.
Press Get information from Viewer to get 3D model information exported from 3DEditor from the Viewer.
Hereafter, this is the Get information from Viewer button.

Select the 3D model to be linked based on information obtained from the Viewer.
Select Model_Link from Select Target Model.
Set Node Name, Effect Name, Create and Follow for the list as follows.
| Node Names | Effect Name | Start/Continue | Follow (S/R/T) |
| Rocket | Model_Link_Line_Effect | 10 / 75 | OFF / ON / ON |
| RocketNozzle | Model_Link_Fire_Effect | 10 / 90 | OFF / OFF / ON |
| RocketNozzle | Model_Link_Smoke_Effect | 100 / 170 | OFF / OFF / ON |
If there is more than one particle under a single effect, set Follow effect to either ON or OFF for all of them. Effects will not be correctly linked if this setting differs.
For details on the Follow effect setting, click here.
You can check the link status by transferring edit results to the Viewer.
You can transfer data to the Viewer using any of the following three methods.
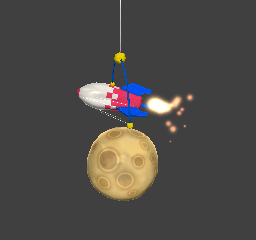
From this point on, the 3D model and effect are linked.
Always put the main mode display in Effect mode first before checking the status with the Viewer.
Use the viewer controls to specify the playback range of the animation using the Viewer.
The following methods are used to display Viewer Controls.
Be sure to set Viewer Controls as follows.
With these settings, the animation can be made to repeat on the Viewer from Frame 0 to Frame 270.
CONFIDENTIAL