
This chapter describes procedures and precautions regarding the use of 3ds Max to create models for NintendoWare.
Nodes
Polygons
Materials
Textures
Skinning
Biped
Physique
In this manual, the term "node" refers to the basic unit for the hierarchical structure of a 3D model.
In 3ds Max, nodes correspond to standard primitives, dummies, and bones.
Although you can assign the same name to multiple nodes with 3ds Max, you should assign a unique name to each material because there is no overlap of node names in the intermediate file.
If multiple nodes with the same name exist, the Export plug-in will operate internally to output the first node that it fetches with the existing name and then to alter the name of each subsequent node by adding the underscore symbol and a number (for example, name_01, name_02, and so on).
In the intermediate file, each model has only one root node.
If there are multiple root nodes on 3ds Max, the plug-in will group them together and add them to the intermediate file as a single node with the name nw4c_root for output.
When exporting, the base point is recognized as the local-coordinates origin.
If the base point is not constant for all frames the data cannot be output correctly.
Note that the visible location of the 3ds Max base point under 3ds Max does not always match the internal location.
When rotating or moving the base point, be sure to confirm the base point location by clicking Utilities > Reset Xform.
If Xform is not reset, the position when Reset Pivot is performed will be processed as the internal base point position.
The visibility of the nodes stored in cmdl reflects the value set in the rendering control Display.
0.0 is interpreted as invisible. Values greater than 0.0 are interpreted as visible.
Interactive invisibility settings are not reflected in the intermediate file.
Billboard nodes are set using the NW4C Set Billboard plug-in.
The settings are not reflected on the 3ds Max screen. Be sure to confirm using the NintendoWare Viewer.
When polygons are output to the intermediate file, the Export plug-in operates internally to divide the polygons into triangles for output.
Output of normal vectors is supported.
If the shading of models output to an intermediate file differs greatly from that shown on 3dsmax, there may be a problem with how data is created.
Check the following if shading is not displayed correctly.
Only one vertex color per vertex is supported by the Export plug-in.
The plug-in also supports vertex shades and vertex alphas.
Conversion from a Max vertex color to an NW4C vertex color is carried out as follows.
NW4C Vertex Color (RGB) = Max Vertex Color * Max Vertex Shade
NW4C Vertex Color (A) = Max Vertex Alpha ((R + G + B ) / 3)
The number of elements exported for vertex color is 4 if vertex alpha is being used (RGBA), and 3 if not (RGB).
The precision of output data is 32-bit floating point if the suffix of any channel name is _f, 16-bit integer precision if the suffix is _s, and 8-bit integer precision if the suffix is _b or there is no suffix. For example, be sure to set the channel name to "nw4cUser0_s" if you want to output the 0th user vertex attribute as a 16-bit integer.
The channel name can be set on the dialog opened by selecting Tools > Channel information on the main menu.
The value set for the vertex paint modifier can be output as a user vertex attribute.
An object having the following channel name is output for four or more map channels.
「nw4cUser0
nw4cUser1
nw4cUser2
(only the U is uppercase)
The color set can be freely used by any game as a user vertex attribute.
The channel name can be set on the dialog opened by selecting Tools > Channel information on the main menu.
The precision of output data is 32-bit floating point if the suffix of the above channel name is _f, 16-bit integer precision if the suffix is _s, and 8-bit integer precision if the suffix is _b or there is no suffix. For example, be sure to set the channel name to "nw4cUser0_s" if you want to output the 0th user vertex attribute as a 16-bit integer.
In addition, the number of data components output can be set by putting a number before the suffix letter used to indicate precision in the channel name.
1 or 2 can be specified for the number of components. The R component is output when 1 is set, while the R and G components are output when 2 is set.
For example, set "nw4cUser1_2f" for the color set name when you want to output the first user vertex attribute as a 2-component, 32-bit floating point number. Similarly, use "_2s" for 16-bit integers and "_2b" for 8-bit integers.
Instances can be output. Although vertex data is shared, instances are output as separate objects.
However, instances of models for which skin has been configured are not supported.
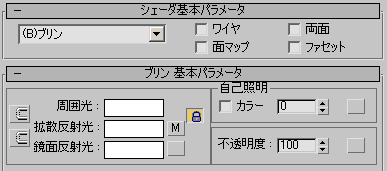
For standard materials use Blinn, Phong, and Anisotropic.
Even if you use materials other than these, output is possible if parameters are the same as a standard material, but no other parameters are supported.
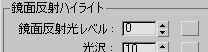
The level and shininess of reflected specular light is reflected in the specular table output.
No anisotropic reflection setting is output. A fixed specular table is output. Tangent information is also output (as calculated from Map Channel 1).
Although you can assign the same name to multiple materials with 3ds Max, you should assign a unique name to each material because there is no overlap of material names in the intermediate file.
If multiple materials with the same name exist, the Export plug-in will operate internally to output the first material that it fetches with the existing name and then to alter the name of each subsequent material by adding the underscore symbol and a number (for example, name_1, name_2, and so on).
Diffuse reflected light is reflected in the diffuse color.
Ambient light is not output. White (255, 255, 255) is always output for the ambient color.
Specular reflected light is reflected in the specular color.
If the specular reflected light level is 0, that material will be output without the specular element.
If diffuse reflected light and specular reflected light are locked, they will be output with the same color. If they are not locked, they will be output with the colors as set separately for each on 3ds Max.
Opacity is reflected in the alpha.
Self-illumination is reflected in the Emission.
When the Color check box is selected, the color is exported as-is. When the check box is cleared, it is converted to grayscale color.
Multi/sub-object materials are also supported.
When multi- or sub-object materials are used, the vertex data stored in cmdl files is divided by each sub-material for output.
When material-related animation has been configured, the state of that material will be judged as transparent, translucent or opaque at export, depending on the state of the Start Frame specified in the options.
Up to three texture can be used per material.
The texture's filename minus the extension is exported as the texture name. Do not use full-width characters or half-width kana in a texture filename.
When referencing textures under 3dsmax, textures are specified by absolute path, relative path, file name, etc.
When an Export plug-in references a texture, texture information is obtained according to the following priority order.
Note: If textures having the same name exist in folders that might be referenced, sometimes the texture displayed in the 3dsmax view will not match the texture to be exported.
Priority order of folders containing textures to be referenced by an export plug-in
max file or based on that folder.The following is a specific example where the texture name to be referenced is test.tga.
If the texture is specified with an absolute path (Ex.: "c:\data\texture\test.tga")
If the texture is specified with a relative path (Ex.: ".\sceneassets\images\rgb.tga")
If the texture is specified with a file name and the texture path is omitted (Ex.: "test.tga")
Maps assigned to all map slots of a material are targets of output. The "bump" map slot corresponds to "normal bump." Map slots other than "bump" support bitmaps or combinations. Other maps (such as tile, check and noise) are not supported.
If the same texture is used multiple times inside a material, each is output. However, if the same texture as one used for opacity is used, it is not output if it is used by another map slot.
If you are using a "blend" map, a multi-texture of up to three textures can be set.
If you use TGA files that have additional information for NintendoWare, the texture formats, palette names, texel data, palette data, mipmap data, cube map data and other data recorded in that additional information are applied to intermediate files.
Currently, TGA files that have additional information can be created using the NintendoWare for CTR Photoshop plug-in. For instructions on using the NintendoWare for CTR Photoshop plug-in, see NintendoWare for CTR Photoshop Plug-in Manual.
Both the height and width of the texture image must be set to a power of two equal to or greater than 8 and equal to or less than 1024.
All formats supported by 3ds Max are supported as texture file formats.
However, image files are not supported.
Texture pattern animations that use the IFL format are supported.
The alpha channel of Photoshop format (.psd) is ignored.
When using a TGA file with additional information, the texture format becomes the format specified in the additional information.
When using a TGA file without additional information, the format is automatically determined according to the rules described below. The same procedure is used to determine the texture format for bmp, jpg, gif, png, tiff, and psd files. If the texture file has an 8-bit alpha value of 255, the texels are treated as opaque.
HILO8 is used for the format for normal map textures without additional information.
Among the "Coordinate" settings, the following parameters are reflected in the intermediate file when exporting:
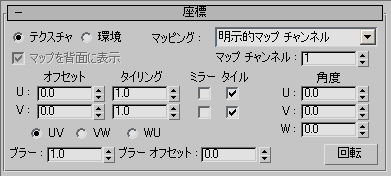
You can reflect the settings for Offset U,V, Tiling U,V, and Angle W in the texture matrix inside the intermediate file.
Specify UV for UV, VW, and WU. There is no support for VW and WU. There is no support for Angle U or Angle V. Be sure to set 0.0.
If Tile is ON, an error results at time of intermediate file output if the width of the texture image (or height) is other than a power of 2.
The Tile settings are reflected in the intermediate file.
There is no support for Mirror. If you want mirrored display of textures, configure the settings using CreativeStudio.
There is no support for Blur or Blur offset.
When there are multiple UV sets, only the UV sets used by the texture are output as the intermediate file's texture coordinates. Because there can be as many as three textures per material, there can also be as many as three texture coordinates.
Using a composite map for the diffuse map, split the map channel up for each texture, and apply the UVW map for each map channel.
Forcibly reference map channel 1 when the model UV map modifier map channel and the material map channel do not match.
Normal mapping representation is supported by the NintendoWare for CTR 3ds Max plug-in.
The procedure for setting normal mapping for NintendoWare with 3ds Max is the same as the method used to set standard normal mapping.
| NintendoWare uses tangent space normal textures. |
To set normal mapping, apply normal bump to the bump map slot of the material, and specify the texture for the normal map.
Output of skinning is supported.
The supported objects are Bone, Biped, dummy, and point helper.
Also be sure not to perform the following operations after applying the skin modifier:
|
Output of characters that use Bipeds is supported.
However, since special processing is performed internally for Biped, normal display is not possible in the following cases.
Normal display is not possible if a scale value other than 1.0 is applied to a Biped's Bone, because the exact matrix information, in which the scale was taken into account, cannot be obtained.
Consider the following points when making character settings.
Make skin pose settings at the origin using a Dummy object or PointHelper object as the Biped parent.
Output of Physique is supported.
The supported objects are Bone, Biped, dummy, and point helper.
Also be sure not to perform the following operations after applying the skin modifier:
|
Physique is output in the Figure mode, but the Biped pose is changed after it is output.
Before running the Export plug-in be sure to save the pose by creating a key in Biped.
If the sum total weight value of all the vertices does not equal 1.0, the weight ratios are retained but the value is adjusted to 1.0 for output.
CONFIDENTIAL