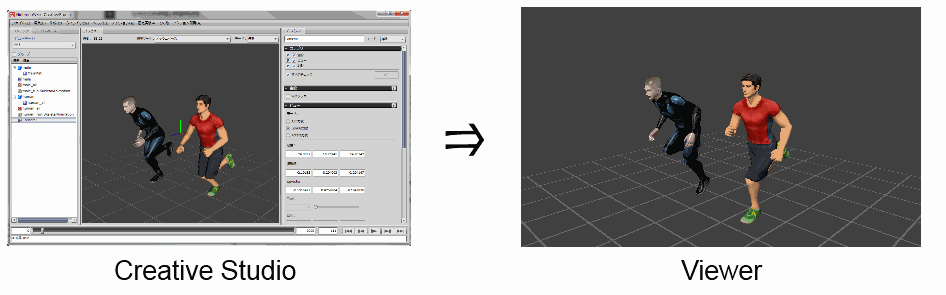
Currently, the following operations are possible through the combined use of Viewer and CreativeStudio.
You can preview 3D model loaded into the CreativeStudio by connecting Viewer to CreativeStudio.
Multiple 3D models can be previewed at the same time if they are all loaded into CreativeStudio.
If an animation is added to the 3D model, that animation can be played.
Camera, light, and fog animations can be played.
The playing, pausing, and frame stepping of animation is controlled using a controller for the unit or a debugging pad.
Binary files (bcres, bcmdl) can be loaded using file reload.
Note: Older versions of binary files cannot be loaded.
For information on saving binary files, see the CreativeStudio manual.
In the 3D mode, you can review 3D models loaded in the Viewer and play back animations.
The 3D mode screen displays the following information:
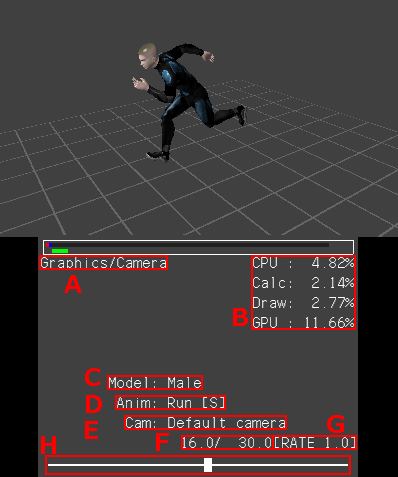

Shows the currently selected main mode and sub-mode.
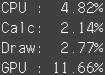
Digital display of the loads on the CPU and GPU for processing of 3D models.
The unit is percentage points. This is the equivalent of the value displayed in the Processing Meter.
CPU: The relative amount of time spent for animating and rendering, up through the completed sending of data to the GPU.
Calc: Time spent for animating.
Draw: Time spent for rendering.
GPU: Time from start to finish of rendering.

The name of the currently selected model for which animation can be switched.

This is the animation that is bound to the selected model. [S] is for scale animation, [M] is for material animation and [V] is for visibility animation.

The name of the camera that is the target of operations in the current selection.

The number on the right indicates the frames being looped. The number on the left indicates the current frame count.

Shows the rate at which the playback of frames advances in one step.

Depiction on a bar of the current animation frame and all animation frames.
The following operations can be performed in 3D mode.
Camera Operations
| Key Operations | Description |
| Slide pad | The camera rotates around the viewpoint. |
| +Control Pad Up/Down | The camera slides along the world y-axis |
| +Control Pad Left/Right | The camera slides along the world x-axis |
| Lower screen (right side 4/5)(Touch panel) |
Slides the camera in the XY direction. |
| Lower screen (left side 1/5)(Touch panel)(up/down) |
The camera slides along the world y-axis. |
| X Button or Y Button |
Moves the camera toward the view point (X Button). Moves the camera away from the view point (Y Button). |
| L Button + Slide pad | The camera slides in a plane parallel to the world XZ plane. |
| L Button + Lower screen (right side 4/5)(Touch panel) | Tilts the camera. |
| L Button + Lower screen (left side 1/5)(Touch panel)(up/down) | The camera slides along the world y-axis |
| L Button + X/Y Button |
Moves the camera toward the viewpoint (the viewpoint also moves)(X Button) Moves the camera away from the viewpoint (the viewpoint also moves)(Y Button) |
| L Button + START Button | Resets the camera position to its initial state. |
| R Button + A Button | Switches the camera being used when there is more than one camera. |
Animation Operations
When a model and animation are loaded, animation can be manipulated using the A and B Buttons and the +Control Pad.
| Key Operations | Description |
| A Button | Starts/stops playback of all displayed model/scene animations. |
| B Button | Stops all model or scene animations being displayed and resets to frame 0. |
| R Button + +Control Pad |
Performs animation frame advance/reverse (left/right). Accelerates/decelerates the animation playback rate (up/down). |
| R Button + Y Button |
Switches the selected model. |
| R Button + X Button |
Switches the animation of the selected model. |
Other
This section describes operations other than camera animation operations.
| Key Operations | Description |
| L Button + R Button + X Button | Reloads the binary files on the PC. The reload destination path is specified from a settings file. |
| L Button + R Button + A Button | Captures a screenshot. The save path is specified from a settings file. |
| Start Button + +Control Pad |
Switches the main mode (up/down). Switches the sub-mode (left/right). |
Camera Operations
| Key Operations | Description |
| Control Stick (Left) | The camera rotates around the viewpoint. |
| Control Stick (Right) |
The camera slides along the world y-axis. (up/down) Slides the camera in the X direction. (left/right) |
| +Control Pad Up/Down | The camera slides along the world y-axis |
| +Control Pad Left/Right | The camera slides along the world x-axis |
| X Button or Y Button |
Moves the camera toward the view point (X Button). Moves the camera away from the view point (Y Button). |
| ZL Trigger Button + Control Stick (Left) | The camera slides in a plane parallel to the world XZ plane. |
| ZL Trigger Button + Control Stick (Right) | Tilts the camera. |
| ZL Trigger Button + X/Y Button |
Moves the camera toward the viewpoint (the viewpoint also moves)(X Button) Moves the camera away from the viewpoint (the viewpoint also moves)(Y Button) |
| ZL Trigger Button + PLUS Button | Resets the camera position to its initial state. |
| ZR Trigger Button + A Button | Switches the camera being used when there is more than one camera. |
Animation Operations
When a model and animation are loaded, animation can be manipulated using the A and B Buttons and the +Control Pad.
| Key Operations | Description |
| A Button | Starts/stops playback of all displayed model/scene animations. |
| B Button | Stops all model or scene animations being displayed and resets to frame 0. |
| ZR Trigger Button + +Control Pad |
Performs animation frame advance/reverse (left/right). Accelerates/decelerates the animation playback rate (up/down). |
| ZR Trigger Button + Y Button |
Switches the selected model. |
| ZR Trigger Button + X Button |
Switches the animation of the selected model. |
Other
This section describes operations other than camera animation operations.
| Key Operations | Description |
| ZL Trigger Button + ZR Trigger Button + X Button | Reloads the binary files on the PC. The reload destination path is specified from a settings file. |
| ZL Trigger Button + ZR Trigger Button + A Button | Captures a screenshot. The save path is specified from a settings file. |
| PLUS Button + +Control Pad |
Switches the main mode (up/down). Switches the sub-mode (left/right). |
| Description of Setting | Description |
| Sort Mode | You can switch between AllMeshBaseSort and OpaqueMeshBaseAndTranslucentModelBaseSort. |
Because displaying information on the lower screen results in a process slowdown and skipped frames, the lower screen is not displayed in the initial state.
To display information, perform a screen information display switching operation as described in Common Operations.
To toggle between show/hide for the lower screen, use the R+B Buttons with a unit controller, or the ZR+B Buttons with a debugging pad.
The gray bar depicts the system load, and processing will slow down and frames will be skipped if the load becomes so high that the bar reaches all the way to the right.
If you want to preview at the given frame rate even though frames will be skipped, enable frame skipping in the General System part of the Initial Settings file
When frame skipping is enabled, you can avoid processing slowdowns by skipping some rendering.
The Load Indicator shows only the load for rendering of the transferred model.
It does not include the loads of the lower screen and grid rendering.
The processing becomes slightly larger when you use nw::gfx::ParticleSetIsBufferFlushEnabledSetter to flush the particle rendering.
CONFIDENTIAL