The figure below shows the changes when
module1.c and module2.cpp are used to make CRO files. 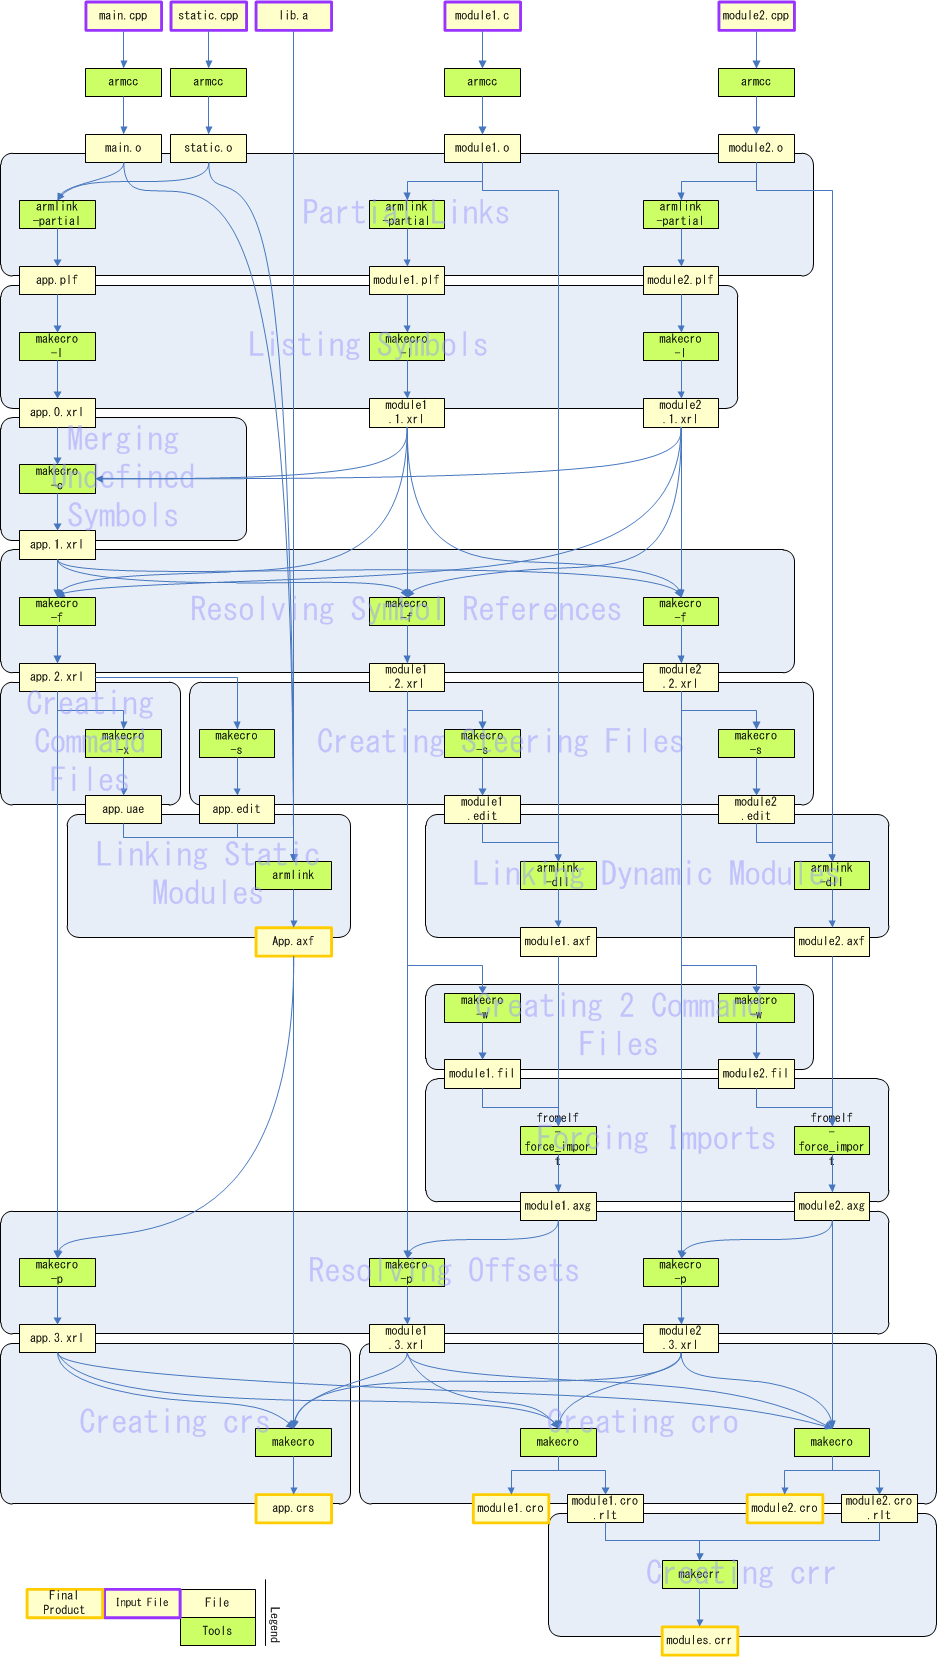
Thus, 14 additional build steps are necessary in order to make an existing build system compatible with CRO.
This document explains how to create a build system that replaces the one provided in the SDK. It provides information necessary for building CRO files and for the CTR applications that use them.
This document provides the minimum information necessary to create a build system equivalent to the one provided in the SDK.
For more information about creating a more flexible and sophisticated build system, see Build System Development Guide (for High-Level DLLs).
See CTR-SDK Build System Manual (for DLLs) for information about the structure and usage of the build system provided by the SDK.
This document assumes basic knowledge of CTR-SDK terminology. See CTR-SDK Terminology for a glossary of basic CTR-SDK terms.
This document sometimes puts content in colored boxes like the one below to indicate that it is a command sequence to be entered on the command line.
command option1 option2
With respect to command syntax, do not enter text enclosed in angle brackets ("<" and ">") verbatim. Instead, substitute an appropriate entry for the placeholder description. For example, the string <CTRSDK_ROOT> indicates that you must enter the CTR-SDK installation path.
Text in the command sequence enclosed by square brackets ("[" and "]") is optional. In the example below, the -a parameter is optional and can be omitted.
command [-a]
Elements in the command sequence joined by the pipe symbol ("|") indicate available choices for a given parameter. In the example below, you can choose either the -a or -b option.
command -a|-b
Strings in the command sequence surrounded by parentheses () and followed by ellipses (...) indicate elements that can be repeated an arbitrary number of times. In the example below, the sequence of -a followed by a path can be repeated.
command (-a <PATH>)...
In this document, the names of Windows tools contained in the tools/CommandLineTools directory are abbreviated by omitting the leading ctr_ and the ending file extension. For example, the abbreviation for ctr_makerom32.exe is makerom.
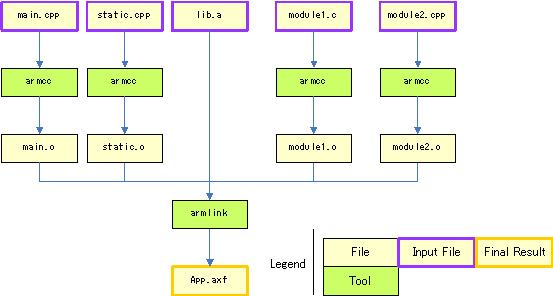
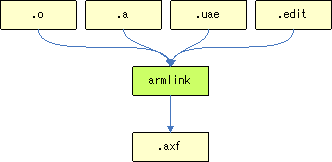
The figure below shows the build sequence when you do not use CRO; for example, if you were to create your application's AXF file from four source files and one static library.
The figure below shows the changes when module1.c and module2.cpp are used to make CRO files.
Thus, 14 additional build steps are necessary in order to make an existing build system compatible with CRO.
The commands to execute at each of these build steps are described below.
The build system uses armlink to partially link the project and get the symbols that the various modules reference and export.
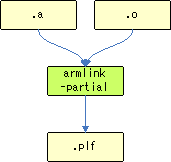
Although you essentially use the same command as when creating an application AXF without using CRO, you must add the following options.
--no_scanlib
--partial
--vfemode=off
If you are targeting a static module, do not designate static libraries as input files.
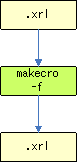
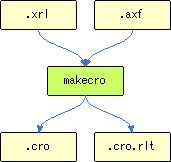
Create a list of symbols from the PLF files, and create the first XRL file. Use makecro to create the list of symbols.
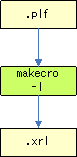
Use makecro to create a list of symbols as follows:
makecro -l [-a] [-i|-e] -o <INPUT_FILE> <PLF_FILE>
OUTPUT_FILE is an XRL file containing a list of the symbols referenced or defined by PLF_FILE. Specify the -a option if you are targeting a static module. Specify -i for a symbol export type of index, and specify -e for a symbol export type of offset. If you do not specify anything, the symbol export type is name.
This updates the XRL file for the static module and specifies that symbols not defined in any module are defined in the static module. This links standard C functions and SDK functions required by the dynamic modules into the static module. Use makecro to merge undefined symbols.

Use makecro to resolve symbol references as follows: (Although the command below is separated into multiple lines for ease of viewing, an actual command cannot contain newline characters.)
makecro
    -c
    [-i|-e]
    -o <OUTPUT_FILE>
    <STATIC_MODULE_XRL_FILE>
    (-r <DYNAMIC_MODULE_XRL_FILE>)...
OUTPUT_FILE is an XRL file created by adding the symbols referenced by DYNAMIC_MODULE_XRL_FILE but not defined by any module to STATIC_MODULE_XRL_FILE. Specify -i for an export type of index for the added symbols and specify -e for an export type of offset. If you do not specify anything, the export type of the added symbols is name.
For each symbol referenced by a module, find the module that defines it, and add this information to the XRL file. Use makecro to resolve the symbol references.
Use makecro to resolve symbol references as follows:
makecro -f -o <OUTPUT_FILE> <XRL_FILE> (-r <REFERENCE_XRL_FILE>)...
OUTPUT_FILE is the original XRL file (XRL_FILE) updated with the contents of REFERENCE_XRL_FILE.
You must execute this command on the XRL files for each module, using that module's file as XRL_FILE and those of the other modules as REFERENCE_XRL_FILE. Assuming that your project comprises static module App and dynamic modules Module1 and Module2, you would need to execute the following equivalent command on all three modules:
makecro -f -o App.f.xrl     App.xrl     -r Module1.xrl -r Module2.xrl
makecro -f -o Module1.f.xrl Module1.xrl -r App.xrl     -r Module2.xrl
makecro -f -o Module2.f.xrl Module2.xrl -r App.xrl     -r Module1.xrl
In the "Merge Undefined Symbols" step, you merged undefined symbols into the XRL file of the static module. Now, create a command-line options file to load these undefined symbols from the static library and export them. Use makecro to create the command file.

Use makecro as follows to create the command file:
makecro -x -o <OUTPUT_FILE> <XRL_FILE>
OUTPUT_FILE is a command file generated based on XRL_FILE.
Create a steering file to give the linker import and export instructions. Use makecro to create the steering file.
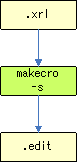
Use makecro as follows to create the steering file:
makecro -s -o <OUTPUT_FILE> <XRL_FILE>
OUTPUT_FILE is a steering file generated based on XRL_FILE.
Use armlink to link the static module, adding the specifications of the command file and steering file to the command-line options.
Although you essentially use the same command as when creating an application AXF without using CRO, you must add the following options.
--base_platform
--edit=<STEERING_FILE>
--override_visi.
--pltgot=direct
--undefined_and_export=nnroAeabiAtexit_
--vfemode=off
--via <COMMAND_FILE>
STEERING_FILE is the steering file you created in the "Create Steering File" step, and COMMAND_FILE is the use file that you created in the "Create Command File" step.
Use armlink to link the dynamic modules, adding the specifications of the steering file to the command-line options.
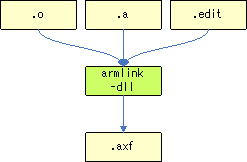
Although you essentially use the same command as when creating an application AXF without using CRO, you must add the following options.
--base_platform
--dll
--edit=<STEERING_FILE>
--no_cppinit
--no_scanlib
--override_visi.
--pltgot=direct
--scatter=<CTRSDK_ROOT>/resources/specfiles/linker/CTR.Ro.MPCore.ldscript
--undefined_and_export=nnroControlObject_
--emit_non_debug_relocs
Set STEERING_FILE to the steering file you created in the "Create Steering File" step. Set the --scatter option to CTR.Ro.MPCore.ldscript rather than CTR.Process.MPCore.ldscript.
Do not specify the following option:
--keep=nnMain
You also do not need to specify crt0.o as an input file.
You must also specify the following option if you use C++ exceptions:
--undefined=nnroEitNode_
Create a command-line option file to implement the changes for symbols for which there were changes to the references in the "Resolve Symbol References" step.
Use makecro to create command file 2.
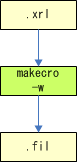
Use makecro as follows to create command file 2.
makecro -w -o <OUTPUT_FILE> <XRL_FILE>
The command file 2 is created based on XRL_FILE and generated as OUTPUT_FILE.
Implement changes to references for symbols for which there were changes to the references in "Resolve Symbol References."
Use fromelf, which is included in ARMCC, to force the references.
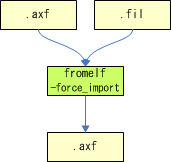
This is how to use fromelf to force the references:
fromelf <axf file> --elf -o <output file> --via <command file 2>
An AXF file for which the changes to the references in "axf file" were applied based on the specifications in "command file 2" will be output as "output file."
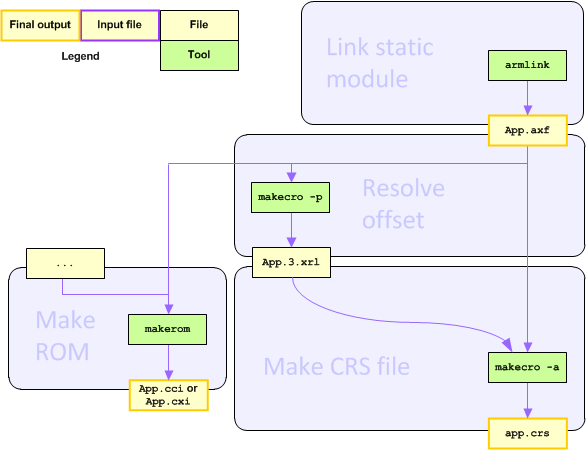
Get symbol-offset information from the AXF file that the linker created, and update the XRL file. Use makecro to resolve offsets.
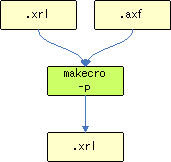
Use makecro to resolve XRL offsets as follows:
makecro <AXF_FILE> -p -o <OUTPUT_FILE> -d <XRL_FILE>
OUTPUT_FILE is the original XRL file (XRL_FILE) updated with offset information based on AXF_FILE.
Create the CRS file from the static-module AXF file and XRL file.
Use makecro to create the .crs file.
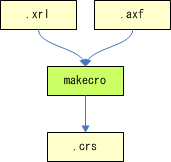
Use makecro as follows to create the CRS file: (Although the command below is separated into multiple lines for ease of viewing, an actual command cannot contain newline characters.)
makecro
    <AXF_FILE>
    -o <OUTPUT_FILE>
    -d <XRL_FILE>
    (-r <REFERENCE_XRL_FILE>)...
This creates OUTPUT_FILE as a CRS file from AXF_FILE, in accordance with the specifications of XRL_FILE. Use REFERENCE_XRL_FILE to resolve the offsets of other modules.
You must execute the command using XRL_FILE to designate the XRL file corresponding to the static module, and REFERENCE_XRL_FILE to designate the other XRL files. Assuming that your project comprises static module App and dynamic modules Module1 and Module2, use the following command to create the CRS file.
makecro App.axf -o App.crs -d App.xrl -r Module1.xrl -r Module2.xrl
Create the CRO files from the dynamic-module AXF files and XRL files. Use makecro to create the CRO file.
Use makecro as follows to create the CRO file: (Although the command below is separated into multiple lines for ease of viewing, an actual command cannot contain newline characters.)
makecro
    <AXF_FILE>
    -o <OUTPUT_FILE_1>
    -t <OUTPUT_FILE_2>
    -d <XRL_FILE>
    (-r <REFERENCE_XRL_FILE>)...
This creates OUTPUT_FILE_1 as the CRO file from AXF_FILE, in accordance with the specifications of XRL_FILE. At the same time, it creates OUTPUT_FILE_2 as the cro.rlt file. Use REFERENCE_XRL_FILE to resolve the offsets of other modules.
You must execute the command using XRL_FILE to designate the XRL file corresponding to the target dynamic module, and REFERENCE_XRL_FILE to designate the other XRL files. Assuming that your project comprises static module App and dynamic modules Module1 and Module2, use the following command to create the CRO files.
makecro Module1.axf -o Module1.cro -t Module1.cro.rlt -d Module1.xrl -r App.xrl -r Module2.xrl
This creates the CRR file by merging the .cro.rlt files. Use makecrr to create the CRR file.

Use makecrr as follows:
makecrr [-d] -o <output file> (-r <.cro.rlt file>)...
OUTPUT_FILE is a CRR file merging the .cro.rlt files (CRO_RLT_FILE). Specify the -d option to store information necessary for debugging the CRO object in the CRR file.
Using the nnroUnresolved function with the static module requires additional build steps.
These steps are the additional build steps that are required to use the nnroUnresolved function with the static module.
A detailed explanation of the nnroUnresolved function is contained in the DLL Manual.
Below is the build sequence surrounding the creation of a CCI file or a CXI file from the AFX file of the application, when DLLs are used:
That gets changed as shown below:
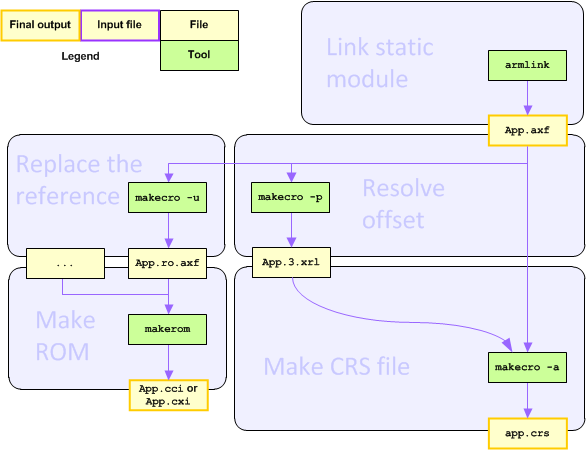
In addition, you need to specify an additional command line option when creating the command file.
The commands to execute at each of these build steps are described below.
If the nnroUnresolved function is used with the static module, you must specify an additional command-line option in the "Create Command File" step. The additional option is -y nnroUnresolved. This is how you would use makecro:
makecro -x -y nnroUnresolved -o <output file> <XRL file>
In the .axf file, the place where the DLL symbol is referenced should be overwritten to reference nnroUnresolved.
Use makecro to replace the reference.
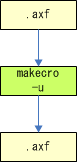
This is how to use makecro to replace the reference:
makecro -u nnroUnresolved -o <output file> <input file>
An AXF file based on the input file, but with the reference replaced, is created as the output file.
--emit_non_debug_relocs as a necessary option in the "Link Dynamic Modules" step.
app.crs in the overall sequence chart.
-d option to Create CRR File. Added the Revision History section.
CTR-06-0203-002-G
CONFIDENTIAL